







この記事の内容
この記事の本文は英語版を掲載しています。日本語訳は準備中です。
Gypsum board ceilings conceal building services and finish the offices, meeting rooms, corridors and service areas of a factory. World Steel installs two main types: concealed-grid ceilings (the frame is entirely hidden above the boards) and lay-in ceilings (exposed grid with drop-in tiles), once the services above the ceiling have been installed, commissioned and accepted.

Choosing the ceiling type
| Type | Features | Suitable for |
|---|---|---|
| Lay-in | Part of the grid is visible; pre-painted or PVC-faced tiles drop into the grid; economical and easy to open for maintenance above; less refined appearance. | Corridors, technical areas, large spaces that need frequent access. |
| Concealed grid | Frame fully hidden, giving a seamless surface like a painted concrete soffit; refined appearance; higher cost and harder access to services. | Lobbies, meeting rooms, executive offices. |
Preparation
- Detailed shop drawings of the frame, ceiling levels, steps, cove light slots and access panels, approved by the supervising consultant.
- All services and equipment above the ceiling accepted; ceiling levels marked and the handover of levels recorded.
- Toilet ceilings are installed after wall tiling.
- Tools: hammer, tape measure, pliers, rivet gun, laser, chalk line, spirit level, screw gun, concrete drill, threaded-rod cutter, saw, screwdrivers; PPE and working-at-height measures.
Concealed-grid ceiling sequence
| Step | Work | Control |
|---|---|---|
| 1. Ceiling level | Transfer the +1.00 m datum onto the walls with a laser; measure up to mark the ceiling level and chalk a line between the marks. | A continuous line round the room. |
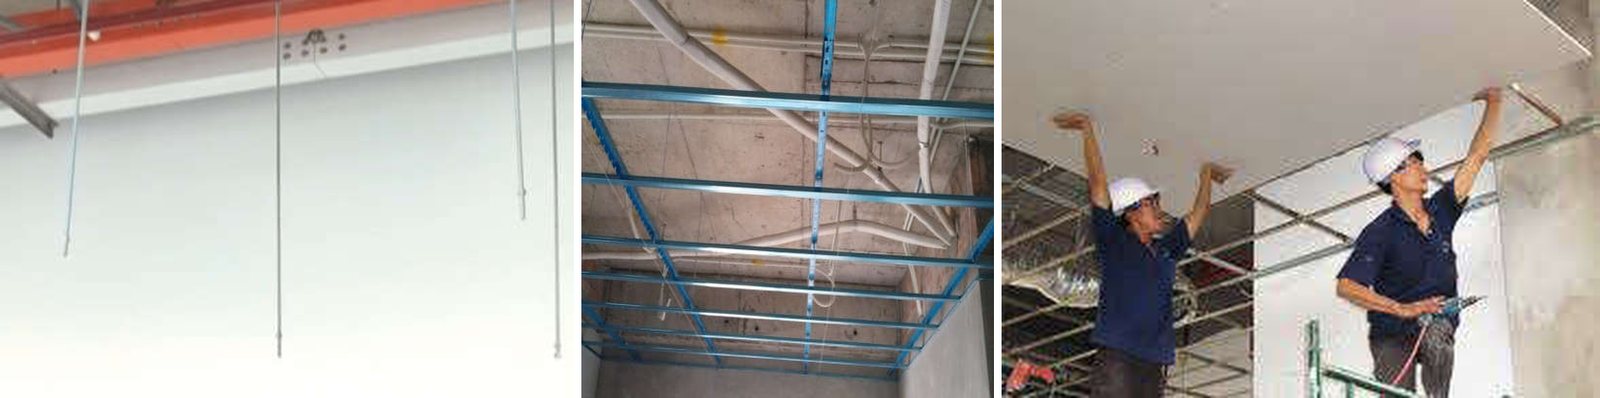
| 2. Wall angle, hangers | Fix the wall angle with nails at 20–25 cm. Drill into the concrete beams and slab at no more than 90 cm; set anchors and screw in threaded rods cut to length. | Turn the rods with pliers, never by bending them. |
| 3. Hanging the grid | Hang the main channels on the rods with nuts above and below (washer before each nut); join channel ends with self-drilling screws; clip in the cross channels at right angles and rivet the joints. | Channel spacing as designed, clear of lights and air diffusers. |
| 4. Levelling | String lines between the wall angles lengthways, crossways and diagonally; adjust the nuts to bring the grid into plane; rivet the cross channels to the wall angle. | Positions of cut-outs and hung equipment; any cut cross channel must be strengthened. |
| 5. Boarding | Hold the board tight to the cross channels and screw at 20–25 cm; stagger the boards, gaps no more than 3 mm; fill the screw heads with jointing compound. | Screw heads just below the board face, no bumps or dents. |
| 6. Jointing | Tape the joints between boards and between board and wall with mesh tape; press the compound in firmly, several passes in one direction. Use mesh corner beads at steps, partitions and arrises. | Accept the joints before skimming the whole ceiling. |
| 7. Skim and paint | After at least 24 hours: a thin first skim, then a second when dry, then sand; paint as for walls. | No ridges at the joints. |
Lay-in ceilings
The sequence is similar, except that steel wire replaces threaded rod because the ceiling is much lighter, and there is no screwing: once the powder-coated grid is assembled, the tiles are dropped into it.
Acceptance criteria
- Levels and dimensions as designed; ceiling level deviation no more than 2 mm.
- Flat, smooth surface with no roughness, ripples, paint build-up, runs or cracks; even colour with no brush or roller marks.
- Ceiling–wall junctions even in colour, crisp and free of cracks; cove slots and steps flat and square with sharp arrises.
- Vertical board faces no more than 3 mm out of true.
- Access panels tight, flush and in the same paint colour; gap round the panel no more than 2 mm.
- Gaps between ceiling boards less than 1 mm.
Common mistakes
| Mistake | Remedy |
|---|---|
| No vertical stiffeners at bulkhead faces | Accept the frame carefully before boarding |
| Services set out wrongly, ceiling patched | Cut openings only against the M&E contractor's signed set-out; patch properly and tape the joints |
| Screws standing proud of the board | Set the screw gun depth; heads just below the face |
| No tape at junctions | Tape everywhere and accept before skimming |
| Ceiling pieced together from small offcuts | Take down and refit; stagger adjacent boards by at least one cross channel, board length across the cross channels |
| Screws too far apart | No more than 20 cm at edges, 30 cm elsewhere |
| Ceiling paint on fittings and walls | Cut in with a brush at junctions |
Reference standards
The edition in force when the contract is signed applies.
- TCVN 8256:2009 Gypsum boards – Specifications
- TCVN 8257:2009 Gypsum boards – Test methods
- TCVN 5674:1992 Finishing works in construction – Execution and acceptance